Ads 468x60px

Labels

Friday, March 22, 2013

I wanted to squeeze in one final Easter treat for those pending parties. These cupcakes are based on a picture I saw on Pinterest last year. Sorry I can’t remember the source. These bunny and carrot cupcakes are adorable and will hop right off the table!

Prepare your favorite cupcake recipe, either from scratch or from the box.

Let's start with the carrot cupcakes.
You will need:
Orange M&M’s or orange reece pieces.
Green M&M’s
White Icing

After you have iced your cupcakes with the white icing, insert the orange candy pieces sideways into a pyramid shape. The first line should be 3 candies, then two and then one. Put two green M&M’s on top to look like leaves. It is as easy as that! Of course now there needs to be some bunnies to go along with these carrots

For the bunnies you will need:
24 marshmallows
Pink M&M’S
Black icing
Pink sanding sugar

To start, cut your marshmallows in half. Dip the sticky side in the sanding sugar. Press down and roll it around to make sure that side gets covered with that sugar. Once the bunnies have been iced (and please excuse the picture- I didn’t realize how thin my white icing was until it was tool ate) place the marshmallows at the top to resemble ears. You will need to do this step pretty quickly after you have iced the cupcakes. Once the icing has dried it makes it difficult to attach the ears.
Next, place a pink candy in the middle for the nose.
Using your black icing, pipe on eyes and whiskers. And then you will have bunny cupcakes to go along with those carrots! 

**Tips- If the marshmallows seem too thick, just cut them in thirds 
Use store bought black icing. It is very difficult to get a black icing at home.
I used pink sanding sugar, but feel free to mix it up. Try yellow, blue and purple to add a   little more character!

Tuesday, March 19, 2013

Peanut Butter Cups

Reese Cups are one of my favorite candies. When I saw a recipe for homemade peanut butter cups in Taste of Home magazine, I knew that I had to make them. These little cups are very smooth and creamy. They are also very simple to make with just a few ingredients.

Peanut Butter Cups

1 stick butter
1- 8 oz pkg cream cheese
1- 17.3 oz jar creamy peanut butter (I prefer Jiff)
1 tsp vanilla
2-3 bags chocolate chips or vanilla candy coating (Do not use vanilla chips)

Cream the butter, cream cheese, peanut butter and vanilla well. Slowly pour in the powdered sugar and mix until incorporated.  
Using a mini muffin tin, place mini cupcake papers. Place about 1/2 tsp chocolate in the bottom of each paper. Tap your tin on the counter several times until the chocolate is evenly distributed on the bottom.  Take about a teaspoon full of the peanut butter mixture and roll into a ball. Slightly flatten the ball and place in the cups. Use your fingers to push the dough down and flatten out in the cup. You want a flat top so the chocolate will settle evenly on top. Take another teaspoon of chocolate and put on top of the dough. Use the back of your spoon to evenly spread the chocolate over the dough. Tap the pan on the counter again to spread the chocolate. Place in the freezer for about 10 minutes or until hardened. 
You can also roll the peanut butter mixture into balls and just dip the balls in chocolate. I like the cups for nostalgia I guess and they are easily recognizable as peanut butter cups. Either way you make these, they will be devoured. I guarantee! 


Wednesday, March 13, 2013

Rainbow Jell-O Eggs

Easter is quickly approaching and I want to share this little treat before it's too late. You will need a special Jell-O egg mold that can be purchased at jello.com for this fun recipe. This is by far my daughters favorite Holiday recipe to make! It's the first thing eaten at every Easter party I've ever taken it to. I first saw this recipe at Porter House and knew I had to try it when I saw all of those beautiful layers!

Rainbow Jell-O Eggs 

You will need:
A pot of boiling water (about 8.5 cups)
6 boxes of Jell-O the colors of the rainbow (ROY G BIV)
A syringe
3-4 Jell-O egg molds
1.5 cups sour cream, cool-whip or smooth and creamy yogurt

Line up your boxes of gelatin in rainbow order next to 5 large cups or bowls. Put each flavor of gelatin in its own bowl or cup. Stir 1.25 cups boiling water into each flavor at least 2 minutes until completely dissolved. Do this one at a time, to make sure each is completely dissolved.
Spray your egg molds with cooking spray very generously. 
Fill molds using a clean syringe with your first color (I start with red) making each layer about 1/4” thick. Keep other colors covered with plastic wrap
Refrigerate for 10-15 minutes or until tacky
Meanwhile, stir in 2 Tbsp. of the yogurt, sour cream or cool whip into the remaining dissolved gelatin. Use a small whisk or fork to get out all the lumps. The last five minutes or so before the first layer is ready you place the light layer in the fridge to thicken. When the first layer is set but still tacky you pour the light color over the dark color. It is important not to wait too long. If the layers are too set they might separate when unmolded. Also, don't squirt the second layer on too hard because you may break the other layers and the colors will run together.
Repeat this process with the remaining colors.
When you finish with your last layer, refrigerate overnight.
The next day fill a bowl with hot water. Carefully dip the molds into the hot water for about 10 seconds. Do not let any water get into the molds, and don't dip too long because the eggs will melt.
Open the molds and you will be looking at these little gems:


I love this recipe! It is time consuming, but the result is so beautiful. Next time I am going to try to get the orange layer to be more distinct, but other than that I am so happy with the way these came out!

Tuesday, March 12, 2013

Angel Lush Cupcakes

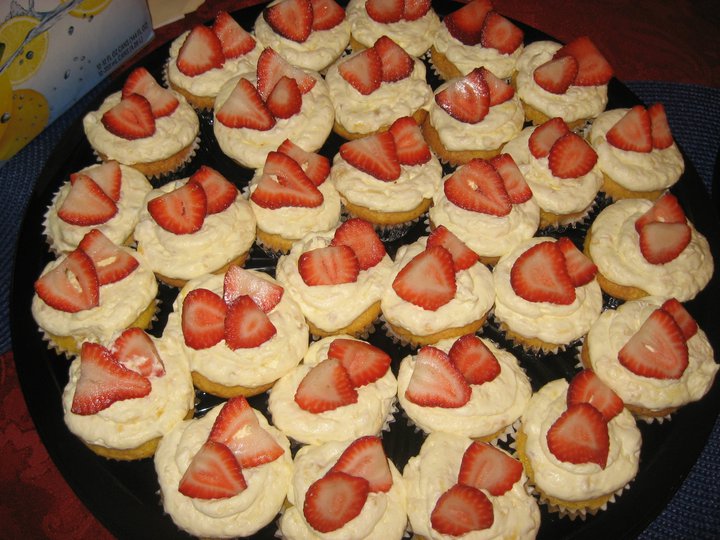
I saw a Kraft recipe for Angel Lush cupcakes. When I tried to make it the angel food cake stuck to my wrappers and it was a food nightmare. Instead of using angel food cake, I used yellow cake mix and they were so light and delicious.

Angel Lush Cupcakes 

1- pkg yellow cake mix
1-3.4 oz vanilla instant pudding
2- cans crushed pineapple in juice, undrained
1- cup thawed cool-whip
2 cups assorted fresh berries of your choosing (blueberries, raspberries, sliced strawberries)

Heat oven to 375ºF.
Prepare cake batter as directed on package; pour into 24 paper-lined muffin cups, filling each cup 2/3 full. Bake 12 to 15 min. or until tops are golden brown
Cool cupcakes in pans 10 min.; remove to wire racks. Cool completely.
Mix dry pudding mix and pineapple in medium bowl. Gently stir in COOL WHIP; spread onto cupcakes.
Top with berries.
These are light and fluffy. So many desserts are heavy and this is nice and refreshing after a big meal. It's also a nice alternative to a chocolate dessert.

Saturday, February 23, 2013

Frog Cupcakes

Ready to jump into Spring? Thses cute little frog cupcakes should help get you in the Spring spirit!

Frog Cupcakes


Make cupcakes any way you want. For these, I used a yellow cake mix and prepared them according to package instructions. Allow cupcakes to cool completely.

You will also need:
Marshmallows
Brown M&M'S
Red icing- (I buy this from the store because it's really hard to get a pretty red icing at home)

For the icing:
Buttercream Icing
2 sticks butter, softened
6-8 cups powdered sugar, sifted
1/2 cup whole milk
1/2 tsp vanilla
pinch of salt
green food coloring

Cream the butter until light and fluffy. Add the powdered sugar and milk, alternating. Add in salt and vanilla. If the icing is too thin, add some powdered sugar. If it's too thick, add a touch of milk.

Ice the cupcakes with your green frosting. While the icing is still "wet" looking you are going to add the eyes. Take a large marshmallows and cut them into thirds. Place two eyes on the cupcake and then add two brown M&M's for the pupils. Snip off the tip of the red icing and pipe on the mouth.


I love how cute these frogs came out! They would definitely add a bit of fun to any party! 

Saturday, February 16, 2013

Oreo Truffle Pops

My boss gave me this recipe a couple of years ago and since then I have seen it on several blogs. These are some of my favorite things to make. I really enjoy making cake pops, but often don't have the time and this is a quick alternative.

Oreo Truffle Pops

1 pkg regular Oreos
1- 8 oz pkg cream cheese, softened
Vanilla Candy Coating, Candy Melts or 2 pkg chocolate chips
Lollipop sticks (found at baking & craft stores) 

In a food processor crush Oreo's  to a fine crumb. If you don't have a food processor, place oreos in a freezer grade, gallon size bag. Use a rolling pin to crush Oreo's. Put crushed cookies into a large bowl and add cream cheese.
Sometimes in the kitchen, your hands are the best tools. Using one hand to gold the bowl, take your other hand and mix in cream cheese until well incorporated.
Roll the mixture into 1 inch balls and place on a cookie sheet. Place cookie sheet in the freezer for about 20 minutes. This makes it easier to dip the balls.
Melt your candy coating or chocolate coating of choice.
At this point you can just dip the balls and place on waxed paper to cool or if you want to make a really pretty display you can follow the following steps to make them pops.
Take the tip of the stick and dip in chocolate. Take the chocolate covered tip and push into ball about 3/4 of the way. You do not want the stick to go through the ball.e also seen them at Wal-Mart
Put the ball in the chocolate and using a spoon, pull the chocolate up and over the ball. Pull straight up and sideways.  Hold it over the bowl in your left hand, and tap your left wrist gently with your right hand. If you use the hand holding the cake pop to shake off excess coating, the force of the movement will be too strong and could cause the cake ball to loosen or come off the lollipop stick. Tapping the wrist holding the cake pop absorbs some of the impact. The excess coating will fall off, but you will need to rotate the lollipop stick so the coating doesn’t build up on one side, making it too heavy on that side.
While the coating is still wet, if desired use sprinkles to decorate.
Place sticks in styrofoam to dry. You can also get cake pop stands at most baking shops and I have also seen them at Wal-Mart.


 I really like to make these because you can really make them for any occasion. Change the colors, change the topping, and a drizzle.  Also to make them for party favours, you can get those little cellophane bags and tie them with ribbon. It makes for a cute gift and they are always appreciated!
If you want some great tips on making pops in general, check out Bakerella's web-site. That lady is amazing and has some great tips on making and decorating pops!

Wednesday, February 13, 2013

Swiss Chocolate Cake

You may have heard this cake referred to as a candy bar cake. Whatever you want to call it, it's delicious! My mother has been making this cake all of my life and I think it's still my favorite cake.

Swiss Chocolate Cake

1 box Swiss Chocolate Cake mix
1 small box instant vanilla pudding
3 eggs
1½ cup milk
1 cup oil

Frosting
1- 12 oz carton Cool-Whip thawed
1 v8 oz pkg cream cheese
1 cup sugar
1 cup chopped pecans
3 Hershey bars

Mix cake ingredients together
Pour into 3 round greased cake pans and bake at 350 for 20-25 minutes
Let cool
For frosting beat cream cheese and sugar
Stir in candy bars
Ice Cake and serve
 This cake is rich, so just be aware of that when slicing. Sometimes for a little extra crunch, I'll fold in 3/4 cup of chopped pecans into the icing and sprinkle about 1/4 cup of chopped pecans on top. Put a few chocolate curls on top and voila! It makes for a pretty presentation and is always one of the first desserts gone at a pot-luck. Enjoy!